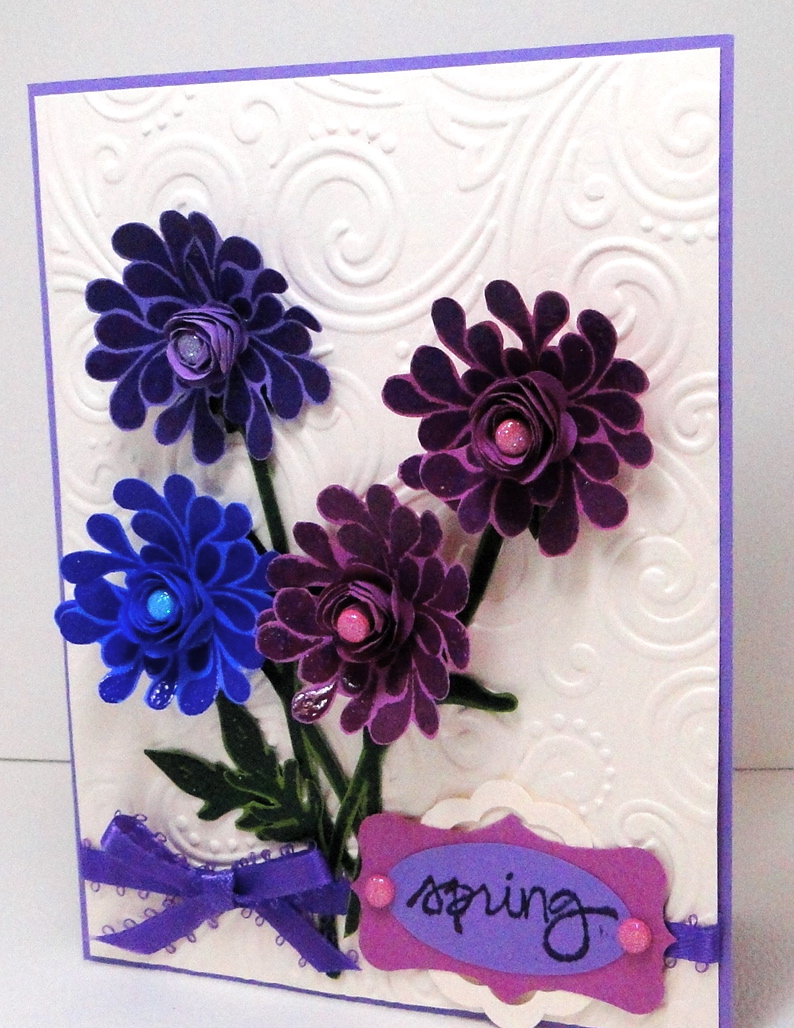
Wednesday, November 28, 2012

Camping with the family. Our first camping experiences....

Cotopaxi was a great place for us to "get acquainted" with our travel trailer. This little KOA site rests on the Arkansas River near Canon City, CO.

We were located in the middle of the park. To our delight a family just next to us were VERY experienced. They had "graduated" to the extra large RV, but were more than willing to impart all the in's and outs about camping. Even helping us get set up with water, electricity and plumbing...a must!


We were delighted to have all the amenities to ease into the "wilderness" thing. The heated pool was so fine! Hot showers, put=put, a dog park, trails, fishing, and r-e-l-a-x-i-n-g.


The river was a perfect place to rest.


Across the river runs the railroad track. We were out for our picture taking stroll when Ken sited the over-sized coyote making his way east, via the rail way! This guy was BIG!


The pavilion provided the perfect scenery during their yearly pig roast fest...and we just happened to be there for it. Yeah, we know WHO arranged that, just as He arranged us parking next to the helpful family!


The PIG weighted 300 lbs and took about 28 hours to slow roast. Awesome! This gang did all the prep, cooking, serving and clean up. The blackened pig was dressed with apples, pineapple, cherries and seasoned to perfection! YUM YUM

Photobucket
Summer....has come and gone. I really have procrastinated for months, reasons vary, to post anything! So, here I am....with my Summer Story!   Water World was sooo much fun. We arrived mid-morning in awe at the oversized rides looming over the park.


We quickly made our way to the cabana to unload and study the map... so may decisions. Everywhere we gazed, the water invited us to join the FUN and the rides called to us "Excitement".                                  


Endless possibilities!


A fun contraption for kids!


Smiles confirm this water slide was a thrill for all.


A happy ending to a fabulous water filled day!


Photobucket


Friday, March 16, 2012

Pretty flowers make a pretty card!

I LOVE die cuts that come with matching stamps! This lovely set has it all...swirling floral plus three flowers. I  actually cut the heart edging first, another new toy! I love the fancy ooh la la look!


The card was then stamped with the swirling greenery, and then flowers added around the card.

The largest flower can stand on it's own. But the set has a separate die and stamp for the "inner" petals. Either way, they look just lovely. I added the red dots to the centers of each flower, matching the outer petals.

Adding a die cut of greenery wrapped around the tag kept the swirling floral look of the card in sync.


Accessories: Sizzix stamp and die set, Marvy Uchida interchangeable edge punch, pastel card stock.


Photobucket
Toys of the trade...try'n them out.

Lately I've added a few tools to my toy box. Naturally I played around to see what I could make of them. There's room for "enhancement", yet they do have a uniqueness worthy of actually being used for a greeting card, in my opinion. And oh the fun!


My husband and I would love to spend time camping. A dream we share is to have a nice camper, and travel.
In honor of dreams and the great out doors, this handsome card is for all the great adventures we hope to share.

The truck is from a roller stamp, and the camper is from a clear stamp set with the trees and tags. Together they worked very well.
A "trail" was cut from an edger. How cool is that!

Trees were first stamped on the background, then matching trees stamped on contrasting colored paper. Foam glue squares helped add depth. The two tags were added last, with the little zebra brad to emphasize "adventure" is just around the bend!


Accessories: Stampin'Up Tailgating roller stamp, BoBunny outdoors stamp set, Jim Holtz Grunge paper,  zebra brad.

Photobucket

Sunday, March 4, 2012

Glossy and pretty!
These pretty colors say spring is coming! I was inspired to brighten up some flowers after touring one of my favorite shops...Simple Pleasures. I like the glossy flowers and bright colors on this one.


The centers for these gem like beauties are made with Sizzix's 3D blossom die. Mine didn't quite look like the one on the package...oh well.
Regular card stock paper is stiff, so I switched it out and used colored paper instead. It does wrap up easier, but could also be the difference in my flower and the one Sizzix advertises.


The stems were made from the Field Flower set by StampIn' Up. Green embossing powder was first applied, then the stems cut out...a little tricky since they are very thin. Make two.

Next, cut the centers using the Sizzix die, roll up and secure with glue. I poured glue down the centers, and used glue dots on the back. A sparkle brad was pushed down into the centers...such a pretty way to glitz up these flowers, and they went well with the glossy finish.

Now make the backs to the flowers, using the same colored paper. Clear embossing ink was used on the flower stamp, which let the color shine through. A single cut to the center, then fold the flower slightly over and glue to make it 3D. Use a glue dot to attach the center to the backs, and more glue dots to attach the completed flower to the card.
A double embossed background was made using already embossed card stock, then embossing again. This one is made with Intricate Floral.

The tag is just two layers, with added sparkle brads...of course. And a bow...bows and flowers just naturally go together!


Accessories: Sizzix 3D flower die, Intricate floral embossing folder, Field Flowers Stamp set, flower stamp for the background, sparkle brads, tag punch, ribbon, embossed card stock, colored paper, green and clear embossing powder, purple card stock.

Photobucket
Spring bouquet

Sizzix has a mini flower set which cuts five little flowers all at once. Nice...and so very handy.
I started out just experimenting with the cut shapes using some bright textured card stock.
Why waste the effort I thought to myself!


Once I got started it seemed using black to offset the bright petals worked nicely. So the layering was black, then a colored petal piece, topped with a black center.

The large and medium size flowers are made from punches of the same flower, just different sizes. They worked well with these Sizzix mini flowers.
The tag is clear and 3D, placed over black card stock. Sheer black pok-a-dot ribbon went perfectly with this frilly theme.
And, the bottom edging of scallops looked more like petals to me up against these spring flowers.

Add a few mini daisy flowers around the card, (the same punch used for the flower centers), to fill in any open space.
How could spring be spring without a couple dragon flies! These were cut from bright green sparkle paper. Two sparkling brads matched these flighty critters, and complemented the embossed green background.


Spring time makes bouquets a natural beauty!


Accessories: Sizzix flowers #4, Large and medium flower punches, dragonfly punch, brads, ribbon, scallop edger, bright card stock, sparkle paper, clear tag, Leafy branch embossing folder.


Photobucket
Pretty flowers make a pretty greeting...

And with the new set I received at Christmas, this card came together. It's simple design gives room for the flowers themselves to take center stage.


First I cropped the corners and added the green background. This cute corner punch was a new find, and on sale.

The green stems are stamped directly onto the card. Next time I'll try overlapping the stems.

The field flowers were stamped, then a couple were embossed. A matching blossom was made as background for the two taller flowers.


The tag followed the theme..."simple". A bronze ribbon at the bottom matched the embossing powder..

And with that, the card was complete.


Accessories: Field Flower stamp set, corner punch, Alleluia stamp, tag punch, ribbon, bronze embossing powder, green and white card stock.


Photobucket