Showing posts with label Brads. Show all posts

Friday, March 16, 2012

Toys of the trade...try'n them out.

Lately I've added a few tools to my toy box. Naturally I played around to see what I could make of them. There's room for "enhancement", yet they do have a uniqueness worthy of actually being used for a greeting card, in my opinion. And oh the fun!


My husband and I would love to spend time camping. A dream we share is to have a nice camper, and travel.
In honor of dreams and the great out doors, this handsome card is for all the great adventures we hope to share.

The truck is from a roller stamp, and the camper is from a clear stamp set with the trees and tags. Together they worked very well.
A "trail" was cut from an edger. How cool is that!

Trees were first stamped on the background, then matching trees stamped on contrasting colored paper. Foam glue squares helped add depth. The two tags were added last, with the little zebra brad to emphasize "adventure" is just around the bend!


Accessories: Stampin'Up Tailgating roller stamp, BoBunny outdoors stamp set, Jim Holtz Grunge paper,  zebra brad.

Photobucket

Wednesday, February 8, 2012

I'm seeing RED!

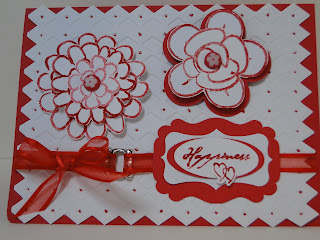
Just the perfect color for February and Valentines Day...Red Red Red! And to finish off my Valentine extravaganza I used some fun stamps and embossing folder with a little extra RED added, of course!


I loved the idea of highlighting the embossed background with a red pen, and then cutting out the edges for the ric-rac effect! The boarder makes the card!

Close up you can see the dots...Red of course. After embossing, I cut the edges out according to the pattern. Then I applied a red Stampin'Up pen and carefully gave each indented diamond a splash of RED.
The Red bow and silver hook added the special effect.


The two flower stamps are from the Flower Fest set.
This larger flower is made with 3 layers and the center was stamped in a lighter pink-red ink for highlights.

I found cute red flower brads for the centers.


This smaller flower has 3 layers too. The larger RED background is easily cut with the large flower punch...it matches the stamp set nicely.

The next two layers are stamped and cut, then fastened with another flower brad.


Add extra dimension to the flowers with foam sticky pads in-between their layers.


                                                                                                                                                                          The tags are finished off with with a quote from Simple Thoughts-Dogs and an extra set of RED hearts.


Accessories: Flower Fest Stampin'Up stamp set, Diamond embossing folder, large flower punch, red ribbon, flower brads and silver hook.


Photobucket

Sunday, January 22, 2012

Bloom'n Blue and Sparkle too!


A lotta bling makes this bloom'n blue flower power greeting card extra special. I combined a few specific tools of the trade to get things started. Start with a combo from Stampin' Up to make the flowers with Triple Treat Flower stamp and right sized punch.
The punch makes the sparkle paper flowers, and the stamp does a nice job on the inner flower. Cut off the outer edge of the stamped flower to show off the sparkles.

Once the flowers are assembled the background is ready to make. For this card I used Spellbinders Flowers emboss/stencil for a letter-press effect. A matching blue ink pad pressed onto the stencil over white card stock created a beautiful background. Be careful when lifting the stencil...the ink smears easily.


These cuties are packed with style and glitz. The inner flower was defined using a dark blue pen on the dots. And, the silver brad matched the silver sparkle in the outer flower. Touch up the flourish with ribbon and a multi-layered tag.  I recently acquired the different sized tag punches which really make it easy.


I had a lot of fun creating this bloom'n blue card...and ya know, it turned out nice!

Accessories: Spellbinders Flower stencil, Stampin' Up Triple Treat Flower stamp & punch, Tag punches, ribbon & brads.
Photobucket

Tuesday, January 17, 2012

Calender Project...gone crazy!

I can't live without a calendar to keep me on track. So when I came across this little project at Simple Pleasures, it seemed a perfect answer and easy too...well, once I got the hang of it!

Stick on clear monthly calenders came with the instructions. And the cool thing is this calender lies flat for mailing, or sliding in an envelope, but is made to stand up. PLUS each month easily tears off, since the paper is perforated! How cool is all that!


The perforated calendar pages are attached with brads. In this style, the 2012 tag is glued over the brads. Nice trick!
The calender pages are attached to the back page, and the flower at the bottom keeps the whole calender from sliding flat. Another nifty trick.

This side view shows the stand up format. The supporting back is one cut of black card stock 11 " x  4.5" and scored to allow folding. I loved how it all came together.


Here is the bottom of the supporting card stock with embellishment...a cute flower & brad attached over a piece of matching print card stock. This keeps the calender for sliding south!
And I have a desk calender to keep me on track, or between the ditches, or somewhere in-between!


Accessories: Clear calender sticky transfers, 12X12 print card stock, black card stock, brads, punch flowers with matching card stock, and foam glue squares.

Photobucket