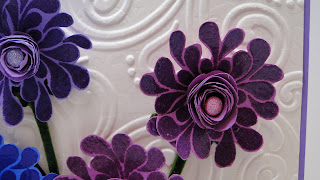
These pretty colors say spring is coming! I was inspired to brighten up some flowers after touring one of my favorite shops...Simple Pleasures. I like the glossy flowers and bright colors on this one.
The centers for these gem like beauties are made with Sizzix's 3D blossom die. Mine didn't quite look like the one on the package...oh well.
Regular card stock paper is stiff, so I switched it out and used colored paper instead. It does wrap up easier, but could also be the difference in my flower and the one Sizzix advertises.
The stems were made from the Field Flower set by StampIn' Up. Green embossing powder was first applied, then the stems cut out...a little tricky since they are very thin. Make two.
Next, cut the centers using the Sizzix die, roll up and secure with glue. I poured glue down the centers, and used glue dots on the back. A sparkle brad was pushed down into the centers...such a pretty way to glitz up these flowers, and they went well with the glossy finish.
Now make the backs to the flowers, using the same colored paper. Clear embossing ink was used on the flower stamp, which let the color shine through. A single cut to the center, then fold the flower slightly over and glue to make it 3D. Use a glue dot to attach the center to the backs, and more glue dots to attach the completed flower to the card.
A double embossed background was made using already embossed card stock, then embossing again. This one is made with Intricate Floral.
The tag is just two layers, with added sparkle brads...of course. And a bow...bows and flowers just naturally go together!
Accessories: Sizzix 3D flower die, Intricate floral embossing folder, Field Flowers Stamp set, flower stamp for the background, sparkle brads, tag punch, ribbon, embossed card stock, colored paper, green and clear embossing powder, purple card stock.


Wowza!! This is gorgeous!! That embossing folder and those flowers??? PERFECT combo!! :)
ReplyDelete